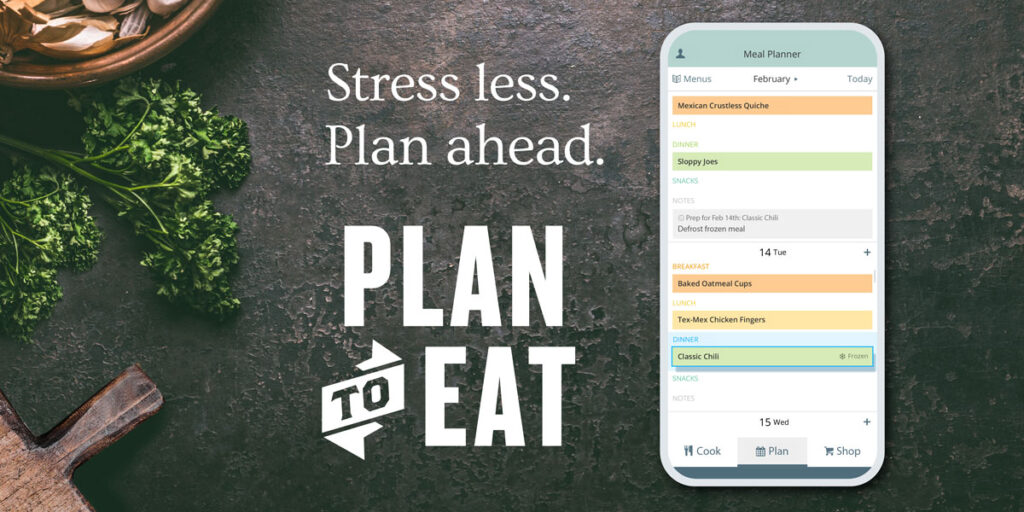

We’re back with another blog post to help you learn more about a Plan to Eat feature that is imperative to getting your meals cooked and on the table: The Planner! In this instructional post we are going to cover all of the options that you have to work with and a few NEW and updated features!
Before we begin, our last post covered The Shopping List, and if you haven’t already, I encourage you to go take a look. Since we published that post, we’ve made a few additional updates that I would like to share with you.
- The Shopping List now loads 3 times faster than it did previously. This will be super helpful for you—especially when your list is fairly long. (We all can relate to grocery trips like that…)
- Edited shopping list items will now keep the recipe/ingredient keys associated with the planned recipe or ingredient. Previously, when you made changes to a grocery item, it would disassociate with the recipe key. The recipe key ( Example: Carrots [A]) located to the right of the ingredient will change to italics (Carrots [A])to notify you that you made changes to the item.
The Planner:
Recipe Book & Queue
When you are on your Planner page you have several options in the left column menu. Click on the Recipe Book button to view all of your saved (and recently added) recipes. You have the same options here as you do in the Recipe Book tab and you can easily filter and search for recipes that you want to add to your Plan.
We’ve talked about the Queue in previous posts, and the Planner is where this feature shines. You’ve already separated your recipes into your queue for easy access; click on the Queue button to view them. Because you’ve already selected this group of recipes, add them to your Planner and you’re done!

The Handle
You’ve scoured the internet for delicious recipes and now it is time to drag them onto the planner, on the dates that you choose. It is important to use the handle tool to drag these recipes. Depending upon the browser you are using, this may be a necessity or the recipes will not move or allow you to place it down on a specific date.

Notes and Ingredients & New/Updated Feature*
This is one of my favorite Plan to Eat features. Notes and Ingredients are very similar, but they have two different functions. First, the notes feature allows you to add leftovers, activities, holidays and anything else directly to your Planner that you do not need to add to your Shopping List. The Ingredients feature will simultaneously add ingredients (and amounts) to your Planner and your Shopping List. This is helpful for meals that don’t need a recipe, single ingredient side dishes, or even to add the school supplies your daughter needs to buy and take to school on Monday. If you need a specific amount of something, simply enter this along with the ingredient name, such as 1 Pint Strawberries. You find that the specific amount is noted on your Shopping List.
To add these to your Planner, simply click anywhere on a date and the popup will allow you to add either a note oringredient. All of the ingredients you add to your Planner will be put onto your list and you’re off to the grocery store with everything you need!
What’s new: Adding ingredients and their quantities is a feature that we removed for a brief period of time so that we could resolve and fix some bugs. I’m excited to tell you that it’s back and you can now edit added ingredients and their quantities!

Edit Planner Options & New Feature*!
It happens frequently that I need to move recipes around on my meal plan to fit changes in my schedule — sometimes even drastic changes that cause me to move all of this weeks meals to next week or deleting the whole plan and starting over. This is where the Edit Planner feature really comes in and saves the day. You copy, move, swap, and delete your meals based on a specific date range. Here’s how to use this feature:
- Click the Edit Planner button at the top of the meal planner to bring up the Edit Planner dialog.
- Then select the action you want to perform (copy, move, swap or delete).
- Select type of items you want to work with (recipes, ingredients and notes).
- Select which sections you would like to work from (breakfast, lunch, supper or snacks).
- Then select the FROM date range you would like to start on. Note: You can see your selections highlighted on your planner and you can drag the Edit Planner dialog around to more easily see your planner.
- Select the TO date If you are not deleting items.
- Finally, click the “(Copy, Move, Swap, Delete) Items” button to complete the process.
What’s new: We’ve recently launched a new aspect of this feature that allows you to click on a specific date or range of dates on your Planner to make changes. To select one day, click along the top row of a date you would like to edit. To select a range of date click and drag along the top row the dates until your specified range is selected. This will highlight the range and the Edit Plan options will open.

Serving Sizes (FAQ!)
Updating serving sizes are important when it comes to preparing enough food for your family. Family meals are often set to 4-6 servings. If your family is larger or smaller, Plan to Eat has you covered. You can easily update the serving sizes of recipes from your recipe book (link), however, if your meals are already placed on your Planner, it is vital that you update your servings directly from the Planner to ensure that your Shopping List quantities update correctly!
Here’s how: Click the Servings button on the Planner to reveal the serving number for each of your planned recipes. Once those numbers show up, enter new quantities into these fields and press the update button! After these changes are made, your List updates automatically. You’re ready for anything — even unexpected dinner guests.

Month & Week View (FAQ!)
You can easily toggle between the Month view or Week view on your Planner using the buttons in the top left corner. This is also where you can select which view of your Planner you want to print. To print the entire month, make sure you are in month view. To print the week ahead, select the week view!
Meal Planner Settings
Next up are the the Meal Planner Settings. This is where you can really begin to customize the Planner to fit your needs. These options include:
- Options to display daily meal times (Breakfast, lunch, dinner..)
- Options to select the day of the week that your Planner begins
- Options to display upcoming weeks
- Options to show nutritional data for each planned meal and daily totals
- Select your Time Zone
- Calendar Feed options
To edit these, click on the gear icon in the top right corner of your Planner. Remember to save your settings!
Menus
(see updated blog post on Menus)
Last, and certainly not least is the menus feature. Menus allow you to save a group of recipes, ingredients and events already on your planner for future use. Once you save a menu, you can easily drag it to your planner on a range of dates in the future! You can create menus from your planner for one day (or one meal), a full or week, or even an entire month or more. Here’s how:
- Customize your weekly (or montly) plan and add recipes, ingredients, notes.
- Select the Menu’s tab on the left and click Create Menu
- Add a name and the specific range of dates that you want to save
- The next time you are ready to plan that menu, navigate to the My Menu’s section and drag it onto your meal plan!
This is also where you can access your Plan to Eat Friend’s saved menus. If your friends have any saved menus, you’ll see a drop down menu for Your Friends Saved Menu’s. Select a friend from the drop down menu and easily add their menus to your plan, just like you would your own!

If you have any questions about our new features, or any of the existing features, please let us know in the comments below or contact us at [email protected]!